Berkley NanoFil
Around February I was digging through the clearance bin at the local outdoors store when I came across a spool of Berkley NanoFil in 3lb test. Normally $20 per 150 yard spool, it was on clearance for ten bucks. I had already heard the hype about the line but wasn’t willing to drop full price for only one spool. This was the perfect opportunity to see if it performed.
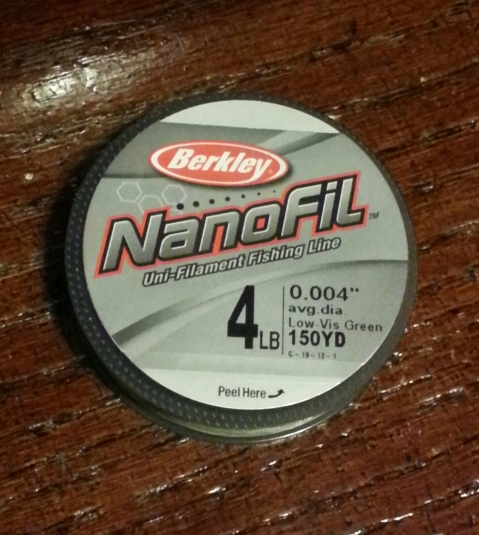
Three pound test was perfect for my ultra light trout rig, so the environment it was tested in was a small Iowa spring creek (McLoud Run). It had to deal with sharp rocks and hang ups on low lying tree limbs. After a few months of hard testing I feel like I have a good idea of what the line is capable of.
I read somewhere, maybe Berkley’s website, that NanoFil will add 30% to your cast. I believe this is in relation to monofilament and not braid, but I will say that it cast more smoothly than a braided line. 30% longer overhand casts is good, but where it shined is underhanded, off balance flips and flicks into hard to reach holes. I found it incredible how I went from passing up holes I thought were unreachable to pulling fish out of them. I credit the improved casting to the smoothness of the line and lack of memory.

How about strength? This is one point I feel less comfortable talking about; keep in mind I was only using a line with a three pound rating. I lost lures on hang ups, but never on a fish. The major weakness in the line are the knots. Such a low friction line requires a very strong knot and I do not recommend the NanoFil knot suggested by Berkey. This knot failed multiple times for me. I recommend a 6-10 turn standards uni knot. Slowly tighten the knot and always check the knot’s strength but applying a good amount of pressure.
Berkeley has hyped this line a lot, and talks quite a bit about the science behind it. You don’t need to worry about the polymerization and chemical bonds to know that is is a very good line. If you have the money to spend on a quality line I definitely recommend Berkely NanoFil.
The Shave
Most men grow facial hair. Most men shave. Most men don’t like to shave. This can be an issue. Whether because of work, preference of a significant other, or the lack of quality facial hair growth (the last two for me) we remove hair from our faces by dragging razors, in varying degrees of sharpness, across skin that probably gets enough abuse as is. The vast majority of men use a brand name cartridge style razor and a can of blue goo. I say, “No wonder you hate shaving.”
Shaving is relatively expensive no matter which route you choose; we’ll discuss different methods later on. For now let’s use the Fusion Pro Glide as a case study. At the local chain drug store an eight pack of cartridges will run you $32. How fast you go through cartridges is a matter of personal preference, but if you have the average man’s beard I suggest a new cartridge every week if shaving every day. This ensures a sharp cutting surface, which is vitally important for a comfortable shave. Therefore, one pack will last two months, and you end up spending $180, and change, on blades per year! Add preshave/postshave routines and you are way north of the $200 mark.
5+1 blades and a light are not necessary items on a razor
Brand name cartridges aren’t all bad. In my experience premium blades are extremely sharp and durable. They also have good moisturizing/lubricating strips that do a phenomenal job and are responsible for the closeness of the shave. However, a cartridge with over three blades is frivolous and can cause potential damage to your skin. With every stroke of a five bladed cartridge you are making five passes with a razor. That isn’t good for skin. The entire purpose of multi blade systems is to stretch the hair with one blade and cut with the following blade. This may lead to the hair being cut below the skin surface, which can result in ingrown hairs…ouch.
My preference for cartridge systems is to use blades from a source such as Dollar Shave Club. If you haven’t heard of them I would suggest you check them out. They ship cheaply sourced cartridges once a month for as little as three bucks a month. There are a variety of blade options so you can order what you feel most comfortable using, and it is easy to upgrade later on. These blades may not have the quality of name brands, but they get the job done at a fraction of the price.
If you’re looking to get away from cartridges there are a couple of options available to you. You could go with the old school, but very useful, safety razor. The biggest cost starting this system is to buy the razor. The blades for the razor can be purchased cheap. The main difference between cartridge style and safety style razors is the number of blades. Safety razors use only one blade. You will also need to be more careful as the entirety of the blade is exposed and can do damage if used improperly. These razors yield a very close shave but require some practice.
A double bladed safety razor such as this Merkur will provide an excellent shave at an affordable price.
The last option is the straight razor. Only consider this if you have a lot of patience and are willing to spend a good amount of time preparing for the shave and during the shave itself. This method will yield the closest and most comfortable shave when mastered. Expect the process of mastering a straight razor shave to take six months to a year. I won’t discuss straight razor types here as there are a lot of good resources available online that are much more knowledgeable than I.
Quality Solingen steel can be had for under $100, but beware that other expenses such as a strop and honing fees will add to this.
Let’s move to the next part of the equation: shaving cream, shaving soap, shaving gel. I consider creams and soaps to be the same product in different forms. Creams don’t necessarily require a shave brush, but I prefer one. Soaps will require a brush, and both soaps and creams can be whipped into a thick lather that will aid in carrying hair away from the face, and most importantly, lubricate your skin so the blade can glide over it. Creams and soaps are generally better for your skin because of the use of natural ingredients that nourish the skin. Oh, I don’t consider Barbasol to be a cream; I’d rather use a gel. Creams I have experience with are Baxter of California and Speick. Both provide good lather and have good lubricating properties provided you are using a soft water source. A puck of shaving soap or tube of cream can run anywhere from two bucks to close to fifty. Quality can be had in the $10-20 range, and the amount you get will last quite a long time.
That leaves the blue goo. If you have shaved in the last fifteen years you have probably shaved with shave gel. It’s cheap, it’s quick, and it’s easy, but I try my very best to avoid it. After working a summer for an industrial detergent manufacturer I know the chemicals used to make the kind of foam you get out of a shave gel. Let’s just say they are used in washing your car. I don’t know about you, but I don’t want that on my face.

I’ll take a couple minutes of prep over the convenience of the blue goo any day. Baxter makes some great products; I also use their after shave balm.
How will any of this information keep you from tearing your face off with a razor? Well, it may not, but I will tell you how I shave, and you can experiment yourself. I always, always, always shave after showering. The combination of heat and moisture from the shower will soften the hairs allowing them to be cut more smoothly, which reduces friction. Friction is bad. Before hopping in the shower I fill a small bowl with the hottest water I can get out of the tap and soak the brush. After showering I whip up a good lather and spend a good amount of time working it into my face. This softens the hair as well as lubricates. From here I begin the shave, making at least two passes, lathering as needed. The first is always with the grain and the next across (not against). If I want the closest shave possible I will make a third pass, against the grain. Be very careful with an against the grain pass as it has the highest possibility for producing razor burn. Pat dry, apply a good aftershave, and enjoy the smoothness…until tomorrow.
I’ve written a little bit about a lot of shaving topics. I tried to keep it pretty general for the sake of brevity. As with any of the blog posts if you have any questions, or directions to links, post your questions in the comments. Thanks!
Caring for Leather Boots
Since ancient times humans have constructed footwear out of leather, and it is still doing a great job. Cowhide, Horsehide, kangaroo, crocodile/alligator, and ostrich: all have been used in footwear. Leather is tough, enduring, readily available, and just looks manly. If you don’t have a pair of leather shoes or boots for either work or casual wear, then here is a hint; you aren’t dressing appropriate. Okay, that’s an overstatement, but what everyone should be able to agree on is that for leather to last a long time you have to treat it well. This article is the first in a two-part series on shoe care focused on cleaning/polishing your leather footwear. Next will be an article on waterproofing and conditioning, but as my boots didn’t really need either of those (which is one step) I’ll hold off until they do.
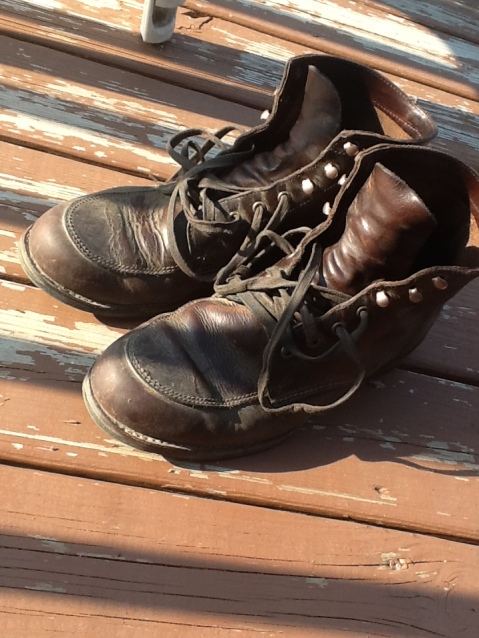
Step one, get some quality leather. My Wolverine 1000 Mile boots are made of Horween Chromexcel leather. Horween is one of the few tanneries left in the United States. If you haven’t heard of them don’t feel bad as most people haven’t. That being said…they are a big deal. You know those really cool Wilson footballs the NFL uses? The leather in those footballs is a version of Horween’s Chromexcel leather, and no, it isn’t made from pig skin. You don’t have to spend the kind of cash a pair of Wolverines will set you back, but be aware that any quality leather will probably cost over $100. Spending your hard earned money on a pair of good boots isn’t a terrible idea though, because I’m going to show you how to make them last a long time.

Step two, get the leather dirty. This will happen with day to day wear. In my case I went fishing today, and my boot got a bit dusty. When you are ready to clean up your boots gather up your supplies; for me this includes: a rag, tooth brush, saddle soap, cotton balls, and polish.

To begin, I run the boots under the sink to get off the free dirt and wet the leather. I then rub in saddle soap by hand over all parts of the boots. Not only will saddle soap clean the leather, but it also helps to nourish and condition it as well. My boots are made with a Goodyear Welt which means there is a crevice around the mid/outsole of the boot. The normally white cord that connects the midsole to the outsole gets dirty and dingy. To brighten the cord back up I wet the toothbrush (soft bristle variety) and apply some saddle soap to the bristles. I gently scrub the welt around the entirely of the boot. I will also scrub any seams and cordage on the shoes. Don’t forget your soles. My boots have a Vibram half-sold and heel, with only a small leather patch between the heel and toe section. Scrub any leather portions of your sole. To speed up the removal of soap I run the boots under the tap while scrubbing with the brush to remove larger chunks of soap. A wet rag will remove any remaining saddle soap. Allow the boots to dry.
Now we have a clean, dry, and slightly scuffed pair of boots. Some people prefer the scuffed/weathered look, but I like a bit of polish. Some say it can be difficult to polish Horween Chromexcel because it is an oil stuffed leather, but I find it takes a polish fairly well.
href=”https://rodandrivet.files.wordpress.com/2013/05/image_3.jpeg”>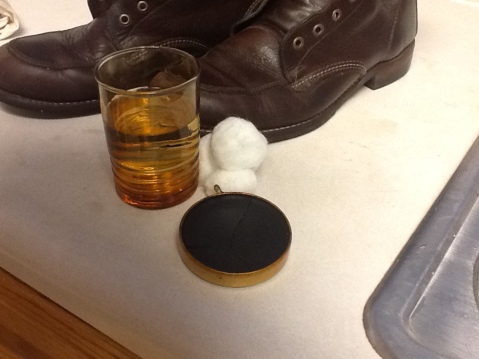
My method involves application of the polish with a wet substrate; I use cotton balls. Wet the cotton ball and squeeze out the excess water. Rub the wet cotton ball in a polish of your choosing and then apply to the leather with small circles. Once I have the color in the places I want it I polish the leather with a wet cotton ball devoid of polish. This should really bring out the shine. Dry/buff with a cloth and you are done with the top of the boot. Because the leather patch on the underside of the boot takes such a beating I apply a bit of Obenauf’s LP to condition it. We’ll discuss Obenauf’s further when I discuss conditioning and waterproofing.

If you are wearing your boots on a daily basis don’t expect the polish to last more than a week, but you shouldn’t have to go through entire process. When I need to freshen up my boots I will clean with a horsehair brush and wipe with a damp cloth. When clean apply the polish as described above and enjoy another week of polish.

